Fastest Tesla
How to Format Tesla USB – All Steps and Ways
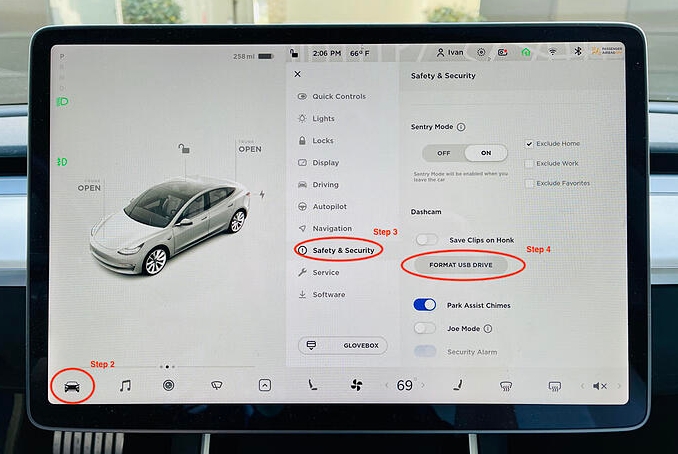
In this article, we will explain how to format Tesla USB for use with Tesla Sensor Cameras and Sentry Mode.

To make sure you don’t get confused, we’ve divided the whole procedure into several parts. It’s pretty quick, you only need ten minutes of free time.
You got that right, there’s nothing complicated here.
In addition to describing the steps themselves, we will tell you about the most frequent problems users have to deal with during the formatting process and how to cope with them.
Contents [hide]
- 1 Where are the USB Ports on Tesla
- 2 How to Format USB Drive From Tesla
- 3 How to Properly Format a USB Drive for Tesla From Windows 10
- 4 How to Properly Format a USB drive for Tesla From MAC
- 5 Common Tesla USB Formatting Issues
- 6 Video: How to Format Tesla USB
- 7 Best USB for Tesla Dashcam & Sentry Mode
Where are the USB Ports on Tesla
We were very surprised to learn that many users don’t even know where to look for the USB ports in their cars.

If you are one of them, we will now tell you where you should find the USB port in every Tesla model.
Model 3/Y
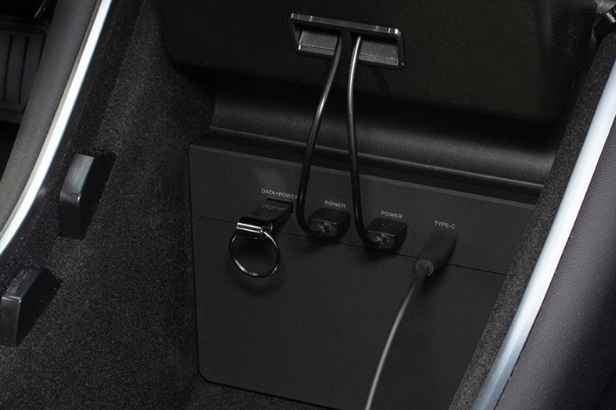
One of the USB ports is located on the rear glass of the center console compartment.
Another one you can find behind the glove box. This is, in our opinion, the most convenient place to connect the USB port, which you will need for proper Sentry Mode operation on the car or for the camera.
Another, last USB port, you can see at the back of the center console.
Model S/X
Both ports are located at the front of the center console.
How to Format USB Drive From Tesla
Before you begin formatting, you should note that Tesla only works with exFAT, MS-DOS FAT, ext3, and ext4 USB formats.

Many 32 GB USB drives sold in stores are already in exFAT format by default. However, USB drives with more than 32 GB of storage are sold in NTFS format, which Tesla refuses to work with.
It follows that if you have to work with a USB drive with a larger capacity, you’ll need to reformat it to any of the car-compatible types, but we’ll tell you about that a bit later.
Let’s not take too long and get down to the formatting process.
More: How To Format Tesla USB – Efficient Guide For Users 2022 (fastesttesla.com)
